school

Saturday, May 21, 2011

Blast Off Into Summer Blog Hop


Thank you. ladies at  www.cricutyourclassroom.com and http://lyndascreativetouches.blogspot.com for a wonderful blog hop!  


 I decided to make a bookmark for each of my students.  I used the My Pink Stamper stamp set, "Fruit and Veggie Puns" and the Cricut Preserves cartridge. The back of each bookmark is printed so the children can keep track of what books they read this summer.


Thanks for stopping by!  I am new to blogging, so I would appreciate new followers!  Leave a comment for some blog candy- a goody bag from my last shopping adventure!  I will draw for the winner Tuesday, May 24th. 
 
Here's the list of blogs & the order
Becky- http://cricutinmyclassroom.blogspot.com --- YOU ARE HERE!

Monday, March 21, 2011

Just Hatched! Opposites Learning Center

Today I am sharing with you the second learning center I made to practice opposites.  


You can read my previous post Ladybug Picnic for more detailed information on how it was made.  I used an Avery template for postcards in Microsoft Word to print the words.  Then I used the "center point" feature on the Cricut Expression to cut each image.  


The folder has a cute title, instructions, and pockets to hold the pieces.  


Making classroom games is one of my favorite ways to use my Cricut.  I am looking forward to sharing many other ideas with you.  


Blessings!
Becky

Sunday, March 20, 2011

Ladybug Picnic - Opposites Learning Center

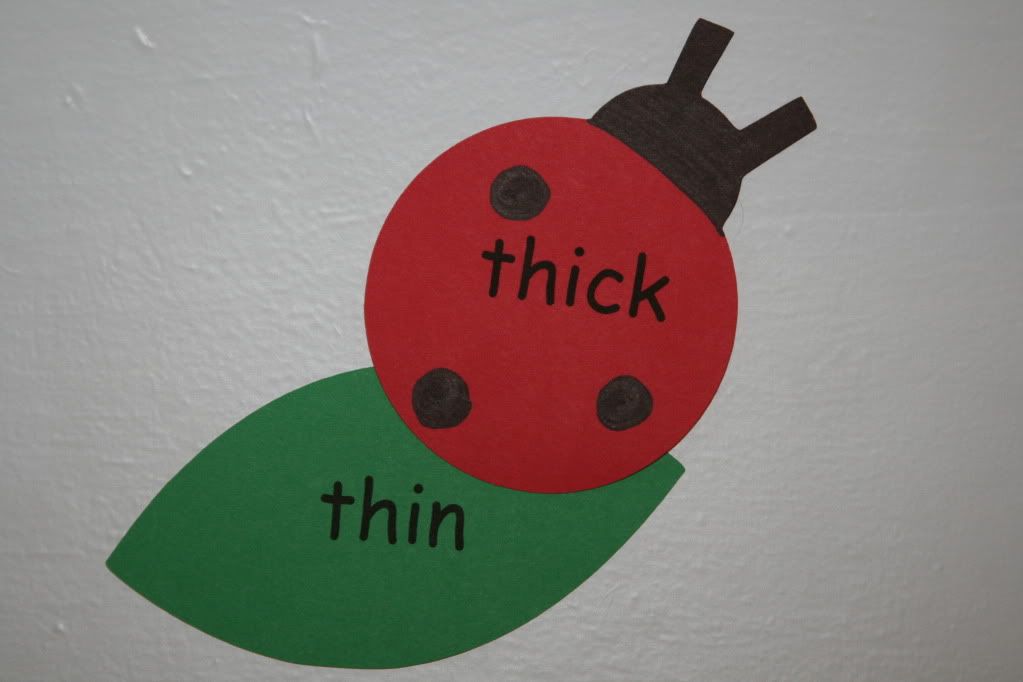
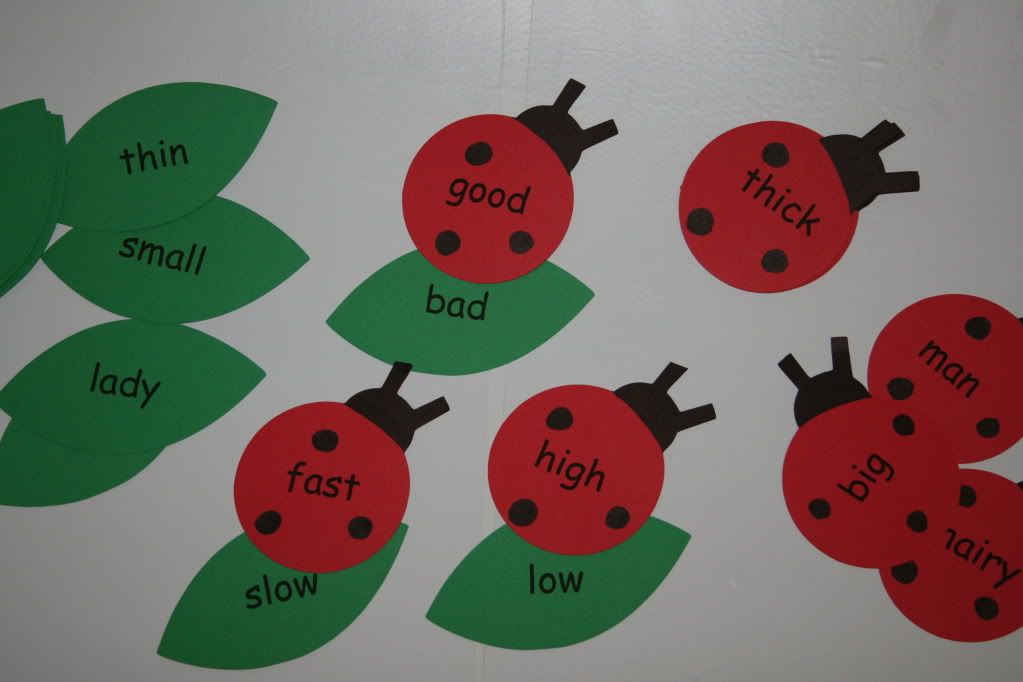
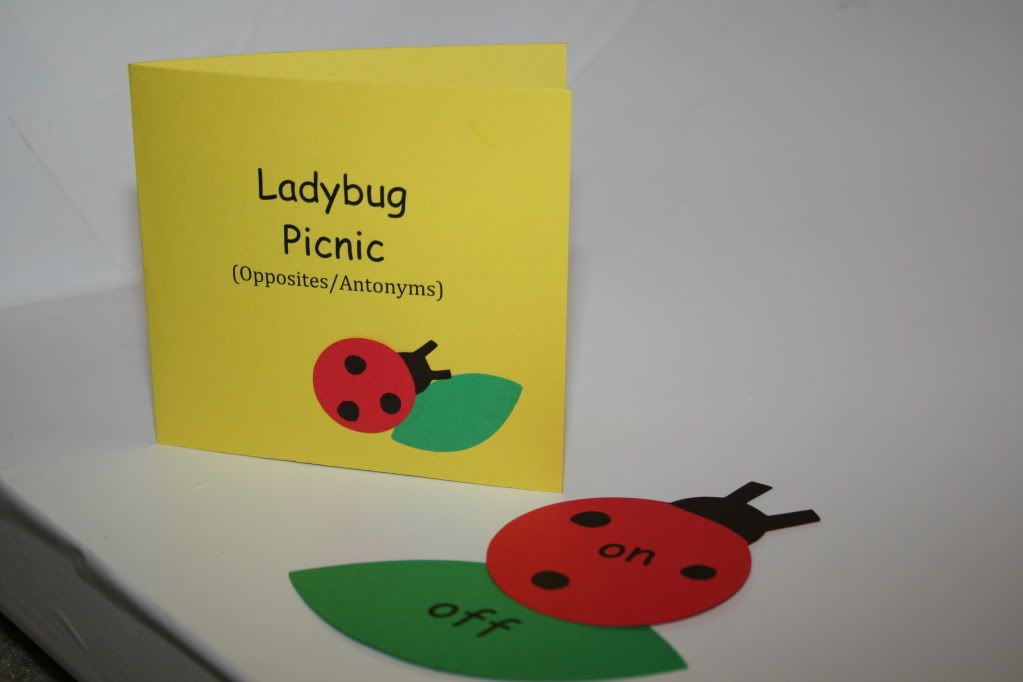
Today I am showing you how I make learning centers for my students. This particular game has ladybugs and leaves to match pairs of opposite words.


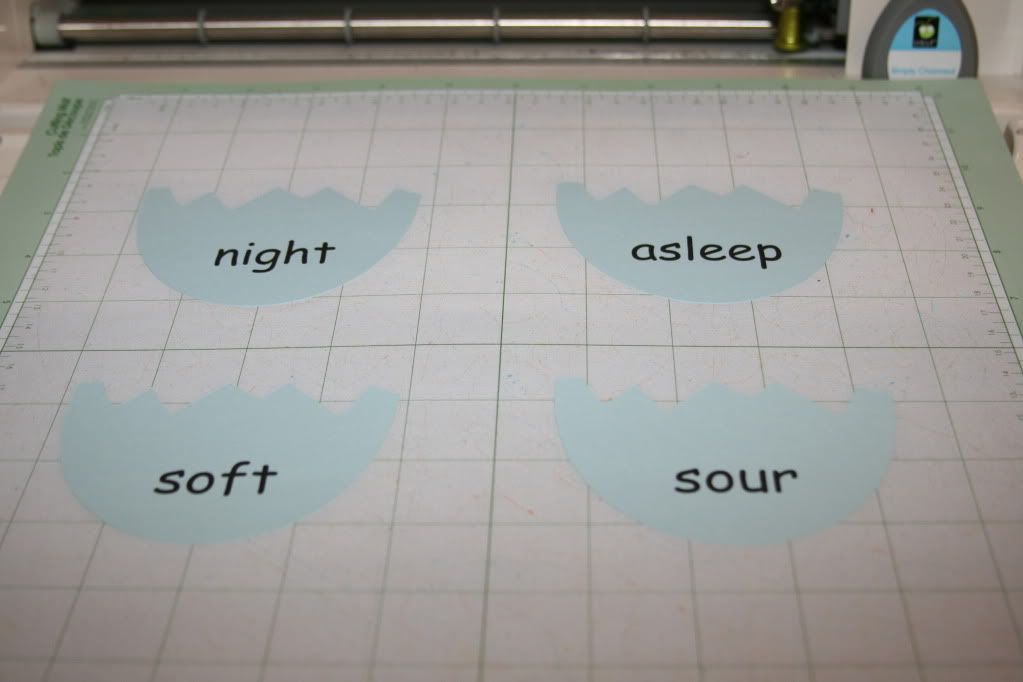
One of my favorite tricks is to make good use of the Avery templates found in Microsoft Word.  There are templates preset for labels, envelopes, business cards, post cards, etc.  These are great friends for teachers.  The business cards and postcards are especially useful to make flashcards, game cards, and learning centers, like I'm making today.  Type and print your desired words and phrases onto colored cardstock.  This is a quick extra step that gives your finished product a neat appearance, in my opinion.  You can always skip this step and hand write your desired words or phrases on the shapes. 

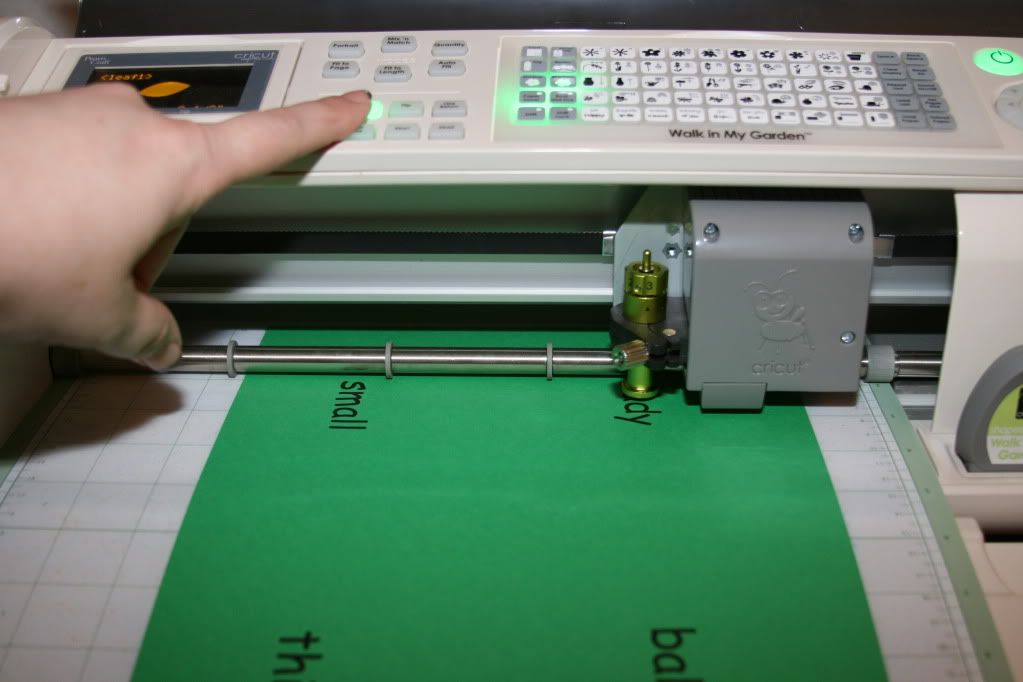
I printed four words on each page, they are automatically centered because of the postcard template. 


I use the "center point" feature on my Cricut Expression to cut each game piece.

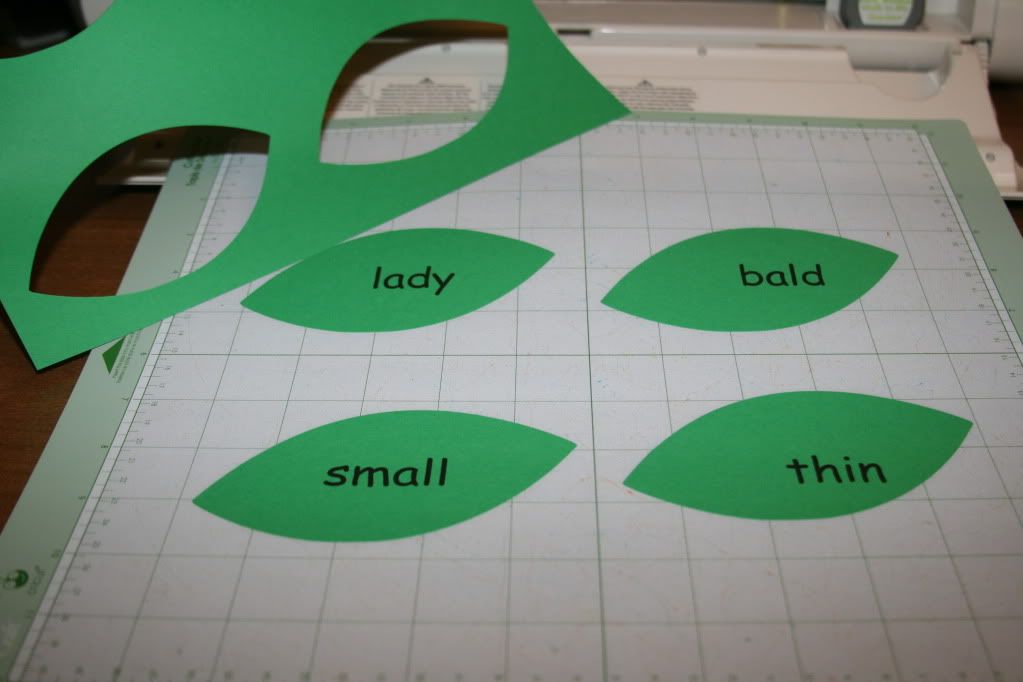
With a little decoration with a Sharpie marker, you have cute ladybugs and leaves.  Normally I would use the layer functions, but I do not used many layered images when making classroom games because the multiple layers do not always laminate well.  If I am taking my time to make learning centers for my students, I almost always laminate them so they are more durable.  These are the ladybug and leaf images, blackout feature, from "Walk in my Garden" Cricut cartridge.  The ladybug is cut at 4 inches, the leaf is cut at 2 1/2 inches.

Now let's make something easy, functional, and cute to store our new learning center.

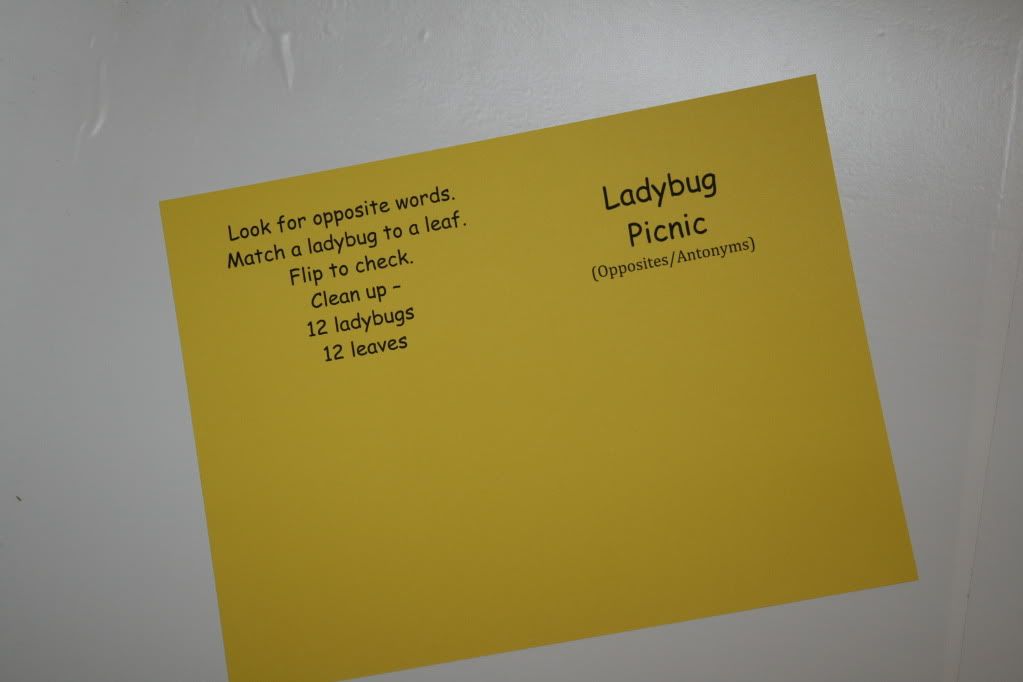
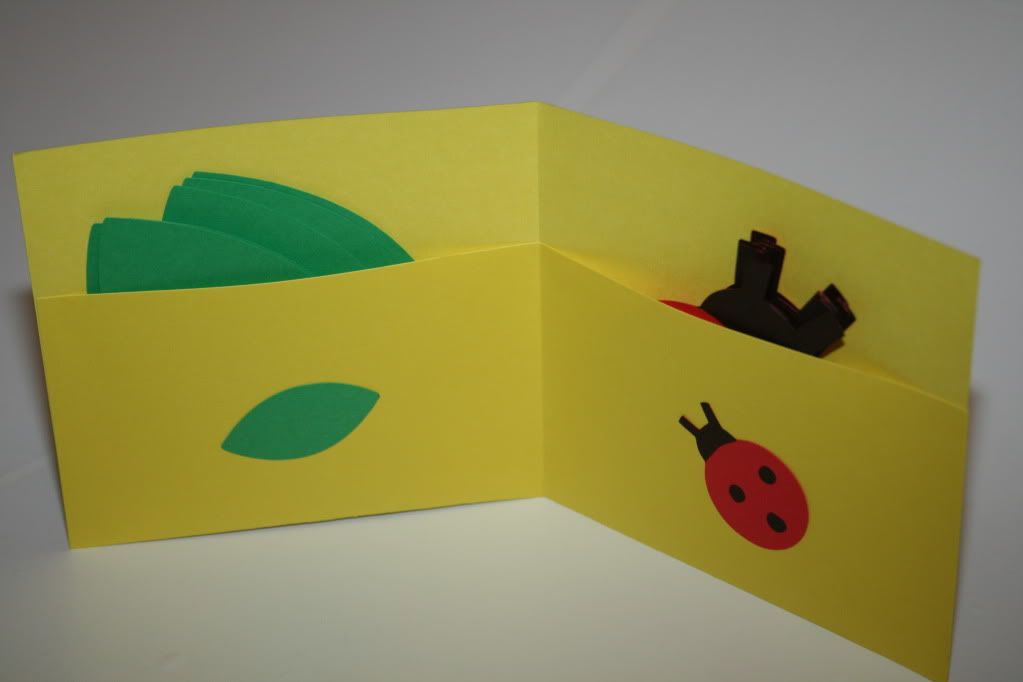
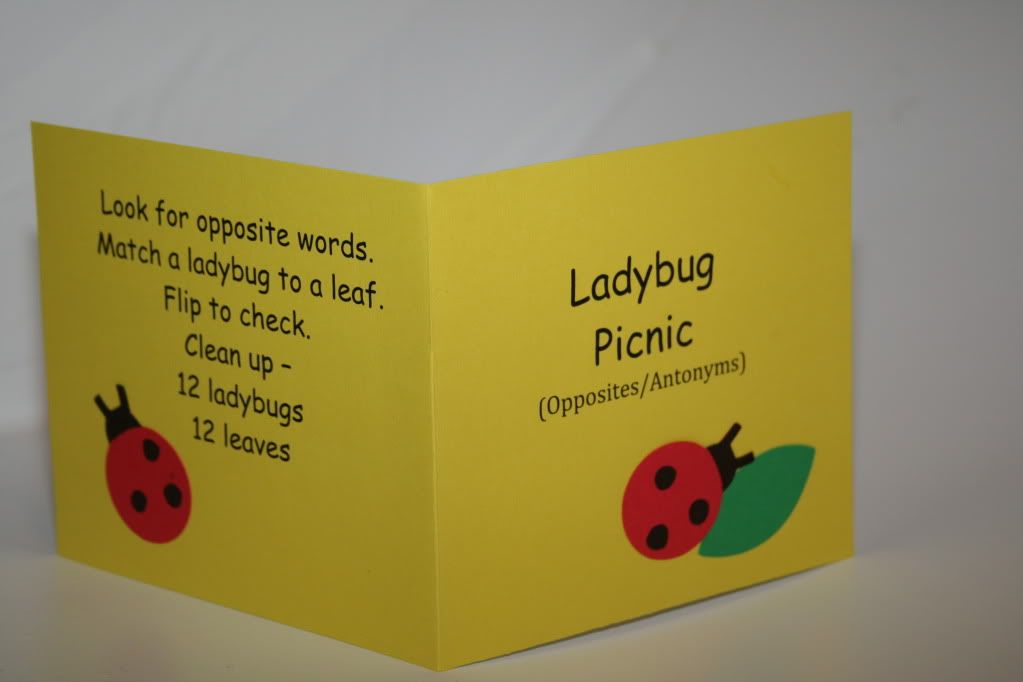
Here you see the little folder I made to keep all the game pieces together.  It has a title on the front cover, instructions on the back cover, and two pockets inside for holding all the shapes. It is folded and put together with adhesive on the edges. I always tell my students in the directions how many pieces are in the learning center.  Hopefully, when they have completed their independent practice and are cleaning up, they will check to make sure all the pieces are back in the game. 
I hope you've enjoyed this little game.  Matching games are quick and easy with the Cricut.  You can use this same idea in your classroom for many different skills. I have one more opposites game to share with you, so check back tomorrow! 


Blessings!
Becky

Sunday, March 6, 2011

Blog Candy Winner

According to random.org, the winner is Michelle!
Her post read:

Michelle said...
i love it! what a great way to show off your class! tfs! scrappinforkenzie.blogspot.com


Thank you all for stopping by my new blog!  I was completely overwhelmed and humbled by your kind comments. Michelle, email me at miss.becky.21@gmail.com so I know where to send your goodies!

Blessings!
Becky 


Tuesday, March 1, 2011

Create A Book Blog Hop

Welcome to "Cricut in My Classroom" and to Joy's Life Create A Book Blog Hop.  If you have not arrived here from Sandra, at 365 Days of Cricut, you may want to go back and start at the beginning.  You don't want to miss any of these creative ideas!   I am new to the blogging community and am excited to be participating in my first Blog Hop.  We are celebrating "Read Across America" by creating our own books.  Read Across America is annual event celebrating Dr. Seuss' birthday designed to promote reading in schools across the country. Our school is having special dress-up days this week to celebrate.  (You'll see me dressed up at the end of this post - I love to embarrass by two boys!)

My book creation combines two of my passions - paper crafting and children's literature.  I am a first grade teacher and my students were more than willing to help with the project.  They shared some of their favorite books and book series, and now I will pass them along to you.  I created a small scrapbook using my new Your Story. 


This is my sweet friend and teacher-neighbor, Kim on the right, and me on the left.  
We are Thing 1 and Thing 2 from Dr. Seuss' "Cat and the Hat."


Blog Candy!!!  For a chance to win the DCWV small stack, Grade School, some school-themed embellishments, and a small pack of clear stamps, leave a comment on this post. I will choose a winner this Friday, March 4th.  Please join me as a follower.  Thanks for stopping by! 
Your next stop is  Misty.  Here is the full list:


Joy - http://joyslife.com/
Tammy - http://tammyjennings.blogspot.com/
Rosy - http://sweetdelightspapernmore.blogspot.com/
Jin - http://www.underacherrytree.com/
Melissa - http://melissa-moecreations.blogspot.com/
Amanda - http://amandascraftsandmore.blogspot.com/
Ruthie - http://www.septemberninth.blogspot.com/
Martha - http://pattisscrapingtime.blogspot.com/
Scraps2Treasures - http://scraps2treasure.blogspot.com/
Suzanne - http://cricutcraftingrammy.blogspot.com/
Sandra - http://365daysofcricut.blogspot.com/
Becky - http://www.cricutinmyclassroom.blogspot.com/  You are here!
Misty - http://www.abusyplace.blogspot.com/
Lisa - http://bitbythecricutbug.blogspot.com/


Blessings!
Becky 

Monday, February 28, 2011

"Cat in the Hat" inspired activities

This week our class will be celebrating Dr. Seuss' birthday and "Read Across America."  Reading is such an important part of first grade.  All of your life, you will read to learn, but in the primary grades, you learn to read.  Seeing those "light bulb" moments in a child's eyes - that is my favorite part of teaching first grade!

This Cat in the Hat inspired project has one design, three suggestions for classroom use, but many more possibilities.

I created a simple hat by welding together two re-sized rectangles on the Gypsy.  
 The first idea celebrates your child's favorite books.  Each child can write the title and author of his favorite books on each stripe.  This will be a great decoration for a bulletin board or classroom display.


 The second idea is an interactive learning center.  Laminate these hats so students can use dry-erase markers on them.  The children can browse Dr. Seuss books to find rhyming words to write on each hat.  The stripes provide room for up to five rhyming words.  Wipe the words off, and they are ready for the next poet!


The third idea is a reading activity to reinforce rhyming words, spelling patterns, or word families.  Use your favorite Seuss titles for inspiration.  


I'll end this post with a wonderful quote by Dr. Seuss, himself - 


“The more that you read, the more things you will know. The more that you learn, the more places you'll go.”

Join us back here, Tuesday, for a Blog Hop to celebrate "Read Across America."

 
Blessings!
Becky

Sunday, February 27, 2011

Picture Schedule

I must admit that I am not very good at adhering to a schedule.  But, I know how important predictability and consistency are in a classroom.  I made these picture cards not only for my students, but also for myself.  They are laminated (sorry about the glare) and have magnetic strips on the back.  I can rearrange them as necessary, change our activity each day, and add any special events on the magnetic white board. 


The images are from the Cricut Cartridges "Locker Talk" and "My Community." I think these two cartridges are a "must-have" for any elementary teacher. The cards are about 5 inches square with the images sized to fit the square.

 I am also pleased to announce I will be on the line-up for my first ever Blog Hop.  It is Tuesday, March 2nd.  I hope you will join us for the Create A Book Blog Hop to celebrate Read Across America Day and Dr. Seuss' birthday!


Blessings!
Becky